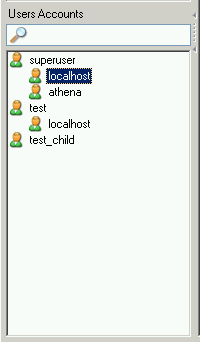
Existing users are listed in the lower left area of the
sidebar. If
there are many user accounts on your MySQL server, the field with
the magnifying glass icon may be handy for filtering the users you
are looking for. Typing in t or
T, for example, will set the filter to users
whose names begin with a t. The filter works in
a case-insensitive fashion.
If you are an experienced MySQL user, you will notice that users
are not listed in the typical MySQL way
(user@host
Note that MySQL Administrator has a different concept of
what a user is than MySQL has. In MySQL, a user
is always identified by a
username/host combination.
This means that, for example, 'brian'@'%' may
be a user completely different from
'brian'@'localhost'. The former might be
Brian Miller, while the latter might be
Brian Schultz. That distinction does not hold
true for MySQL Administrator: User brian is always
a particular user, no matter from which host he connects to the
MySQL server. That said, 'brian'@'%' may still
have privileges different from
'brian'@'localhost'.
For example, you might have a user called
superuser. If double clicking on that user name
shows two subcategories, localhost and
athena, this means that the user has a specific
set of privileges if he/she connects from
localhost, and a (probably different) set of
privileges if he/she connects from athena.
Right clicking on a user name, or on one of the subcategories a user might have, provides access to the following commands:
Add a new User: Selecting this command adds a new user with the default name
New Userto the user list. You will have to fill in at least a user name in the MySQL User field of the User Information tab, which, after applying this change, will also rename that user in the user accounts list.Add Host from which the User can connect: Allows you to specify a host from which the user can connect. This command is unavailable if you highlight a subcategory.
Remove Host from which the User can connect: Allows you to remove a host from which the user can connect. If there are no sub-categories, the user will be removed (you will be prompted to confirm the removal).
-
Clone User: Makes a copy of the selected user, including all subcategories. The new user is called
New Useruntil you specify another name in the MySQL User field of the User Information tab. This command is useful for creating users with identical privileges.Note
Cloning is only available on Windows.
Delete User: Allows you to delete the selected user. You will be prompted to confirm that you really want to delete that user.
Refresh User List: Rereads the user list from the MySQL server. This is helpful when other users (on other connections) are editing user accounts. Note that selecting that command will collapse all subcategories.

